IBM Cloudant is a fully-managed, distributed database that runs as a service on IBM Cloud. It is based on Apache CouchDB and the easiest way to access it is with an IBM Cloudant client library. As of this writing, IBM CLoudant client libraries are available for Node.js, Python, Go and Java.
To illustrate how this works, I’ll provide a few examples of how to connect to, and use, an IBM Cloudant database service from Node.js using the Node.js client library. I’ll assume here that you have already deployed an IBM Cloudant service and have obtained service credentials for it.
Install the Node.js client library:
npm install @ibm-cloud/cloudant
Let’s start with something simple: creating a database.
// import libraries
const { CloudantV1 } = require('@ibm-cloud/cloudant');
const { IamAuthenticator } = require('ibm-cloud-sdk-core');
const util = require('util')

// configure access token and public endpoint
const url = 'YOUR-CLOUDANT-HOSTNAME-HERE'
const apikey = 'YOUR-API-KEY-HERE'

// create IAM authenticator
const authenticator = new IamAuthenticator({
    apikey: apikey
});

// create and connect service with authenticator
const service = CloudantV1.newInstance({
    authenticator: authenticator
});
service.setServiceUrl(url);

// create database
service.putDatabase({db: 'mydb'}).then((result) => {
    console.log(util.inspect(result))
}).catch((e) => {
    console.error(e)
})
Save and execute this script from the command line. Here’s an example of the output:
{
  status: 201,
  statusText: 'Created',
  headers: {
    'cache-control': 'must-revalidate',
    'content-type': 'application/json',
    ...
  },
  result: { ok: true }
}
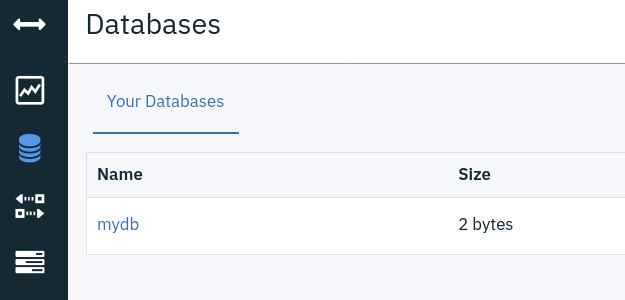
If you launch the IBM Cloudant dashboard from your IBM Cloud dashboard, you should see the new, empty database.
Here’s another example, this one creating a document in the IBM Cloudant database.
// import libraries
const { CloudantV1 } = require('@ibm-cloud/cloudant');
const { IamAuthenticator } = require('ibm-cloud-sdk-core');
const util = require('util')

// configure access token and public endpoint
const url = 'YOUR-CLOUDANT-HOSTNAME-HERE'
const apikey = 'YOUR-API-KEY-HERE'


// create IAM authenticator
const authenticator = new IamAuthenticator({
    apikey: apikey
});

// create and connect service with authenticator
const service = CloudantV1.newInstance({
    authenticator: authenticator
});
service.setServiceUrl(url);

// create document
document = {
    "name":"eggs",
    "quantity": 7
}

// save document to database
service.postDocument({db: 'mydb', document: JSON.stringify(document)}).then((result) => {
    console.log(util.inspect(result))
}).catch((e) => {
    console.error(e)
})
Save and execute this script from the command line. Here’s an example of the output:
{
  status: 201,
  statusText: 'Created',
  headers: {
    'cache-control': 'must-revalidate',
    'content-type': 'application/json',
    ...
  },
  result: {
    ok: true,
    id: '5e5556f5abc5e2d2ed15e1983e6a0b74',
    rev: '1-f6f1d9612289a47514d32fb11fc0a069'
  }
}
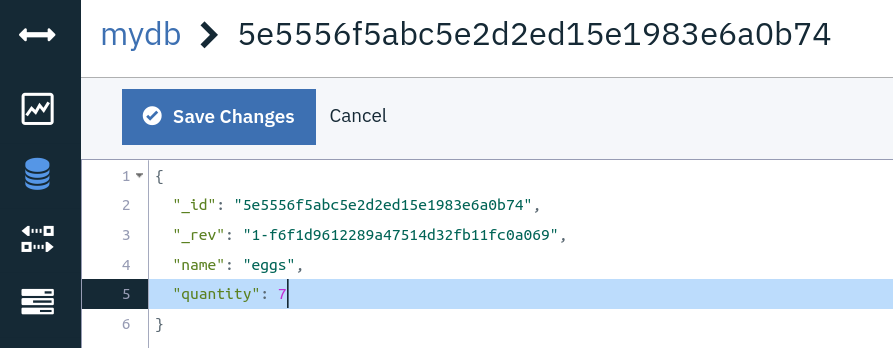
If you check the IBM Cloudant dashboard, you should see the new document in the database.
The examples above merely scratch the tip of the iceberg - there’s a lot more you can do with the IBM Cloudant client library for Node.js. Refer to the IBM Cloudant documentation and the GitHub repository examples for more information on the available API methods.